Building TGUI from source code (with CMake)
You need to use CMake in order to build TGUI. This tutorial provides an overview of available settings in CMake, instructions on using CMake and information about the build step after running CMake (which depends on which generator is selected in CMake).
If your own project also uses CMake and you want to build TGUI as part of your project with CMake’s FetchContent module, then you can skip this page (except the “TGUI properties” section) and go straight to using TGUI from a CMake project.
TGUI properties
This is a list of TGUI related properties that you might want to specify in CMake. Other properties exist, but the ones listed here are the ones that you are most likely to need.
| Property | Description |
|---|---|
| CMAKE_BUILD_TYPE |
Sets whether you want to build "Release" or "Debug" libraries. On Windows you need to use Debug libraries when your project is in Debug mode and Release libraries when your project is in Release mode. On other operating systems you only need the Debug libraries if you actually want to be able to debug inside the TGUI libraries, so you can usually leave it at Release (default) if you aren't using Windows. Note that this option is ignored when using the Visual Studio or Xcode generator, where this setting has to be changed in the IDE after CMake finishes. |
| TGUI_BACKEND |
Sets the backend to use for rendering and OS interaction. More information on this can be found in the 'Selecting backend in CMake' tutorial. |
| TGUI_SHARED_LIBS |
Sets whether you want to build shared or static libraries. Static libraries are included inside your executable while shared/dynamic libraries will require you to include the library as a separate file when distributing your executable (the .dll file on Windows). Static TGUI libraries will have "-s" at the end of their name. Projects that use static TGUI libraries must add "TGUI_STATIC" to their preprocessor definitions. |
| TGUI_CXX_STANDARD |
Sets which c++ standard should be used by TGUI. Your own project has to use a c++ version that is equal or higher to the specified version. You can build a c++14 TGUI library and use it in a c++20 project, but you can't use a c++20 TGUI library if you only compile your own project with c++14. This option is set to "14" by default for maximum compatibility (TGUI requires at least c++14, you can't specify lower values). When set to "17", TGUI code will make use of slightly more efficient code (e.g. using std::variant and std::optional instead of emulating them with c++14 code). When set to "20", the tgui::String class will e.g. get conversion functions from and to std::u8string. No gui functionality is lost be keeping this property at "14", all widgets have the same features at any c++ version. |
| TGUI_BUILD_GUI_BUILDER |
Sets whether the Gui Builder application should be build as well. The Gui Builder provides a way to visually design your forms. |
| TGUI_USE_STATIC_STD_LIBS (Windows only) |
Sets whether TGUI should link to the dynamic or static version of the std library. Note that this has no relation to TGUI_SHARED_LIBS and that you do NOT have to check this when you want static TGUI libraries. This option changes "/MD" to "/MT" in Visual Studio and adds "-static-libstdc++" to the linker for MinGW. Those are settings that have to match with your project and other dependencies of your application, so if you aren't touching these settings on your own project then you must keep this option at FALSE. This option will only be shown in the CMake GUI if "Advanced" is checked. |
| TGUI_BUILD_FRAMEWORK (macOS only) | Sets whether you want to build a .framework or a .dylib library. |
CMake from command line
There are 4 important flags that you can specify to cmake:
-S: The source directory, which is the root of the downloaded TGUI folder.-B: The build directory, which is a new empty directory in which the final libraries and temporary files will be placed. The folder will automatically be created if it didn’t exist yet.-G: The build system generator to use. CMake doesn’t actually build the TGUI libraries, it just creates a project (Visual Studio, Xcode, Makefile, …) of your choice, which in turn builds the library. On Linux and macOS the default is “Unix Makefiles”, so you only need to specify it if you want something different or if you are using Windows. The available generators can be found in the CMake documentation.-D: Specifies a value for an property. This is what you need to use to change the value of the TGUI properties listed above. Boolean properties can be set to TRUE/FALSE, ON/OFF or 1/0, whichever you prefer.
Example command that can be executed from inside the downloaded TGUI folder:
cmake -S . -B build -G "Visual Studio 17 2022" -D TGUI_BACKEND=SFML_GRAPHICS -D TGUI_SHARED_LIBS=FALSE
When using Visual Studio you might also want to add -A Win32 or -A x64 to explicitly choose whether the libraries need to be 32-bit or 64-bit.
As long as you don’t delete the contents of the build folder, CMake caches previous settings. If you call cmake with -D X=1 and then later call it again without specifying a value for X, then X will still equal 1.
If CMake can’t find its dependencies, or if you don’t specify TGUI_BACKEND (which is the only TGUI property without a default value), then an error will be printed. Please read the error carefully, as errors printed by TGUI usually tell you which properties to change in order to proceed.
When successful, CMake will print “Configuring done” and “Generating done”. You now have to use the generated project in the build directory to build TGUI. You can find instructions in the sections below, depending on which generator you selected.
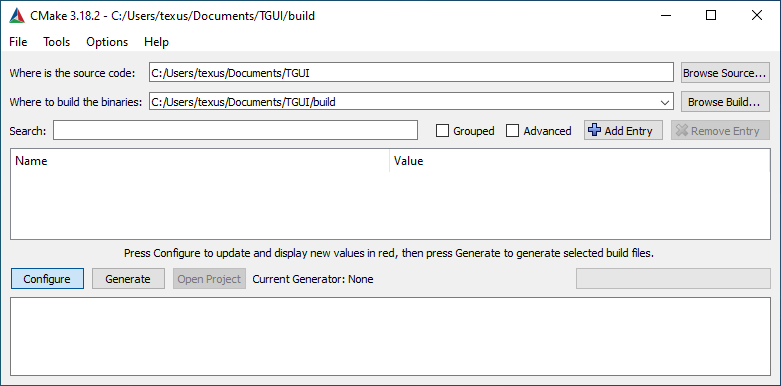
CMake GUI
The source directory in CMake should be the TGUI directory that you downloaded. The build directory is a new empty folder that you can choose in which the final libraries and temporary files will be placed. Once you filled in the two paths, you can click the “Configure” button. CMake will propose to create the build directory for you when it didn’t exist yet.
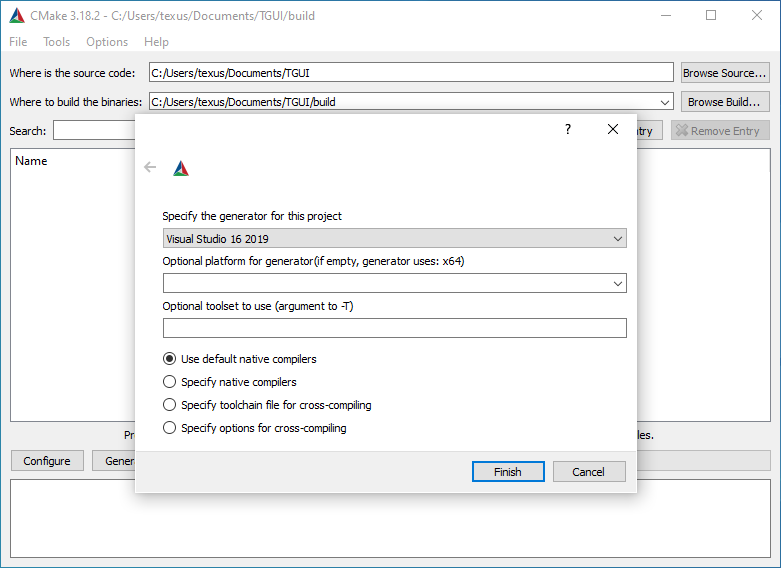
You will then be asked to select a generator. Which one you should select depends on your OS and compiler.
On Linux and macOS, you can select “Unix Makefiles”. On Windows, you can select “Visual Studio xx yyyy” for Visual Studio and “CodeBlocks - MinGW Makefiles” for CodeBlocks. Normal “MinGW Makefiles” can be selected when using a MinGW compiler with a different IDE.
You can change the platform to “Win32” or “x64” if you want to change the default. The “Use default native compilers” should usually remain checked.
Press “Finish” in this child window to continue.
At this point CMake will show an error because the value for TGUI_BACKEND hasn’t been provided yet. The error message (shown in red at the bottom of the CMake window) will show which values can be provided. By default, SFML_GRAPHICS will be preselected, so the script will continue with that backend if you just press Configure again.
Now that the backend is selected, CMake will search for TGUI’s dependencies. This may result in new errors if they can’t be found automatically. Please read the errors carefully, as errors printed by TGUI usually tell you which properties to change in order to proceed. The ‘Selecting backend in CMake’ tutorial also provides information about how to let CMake find each dependency.
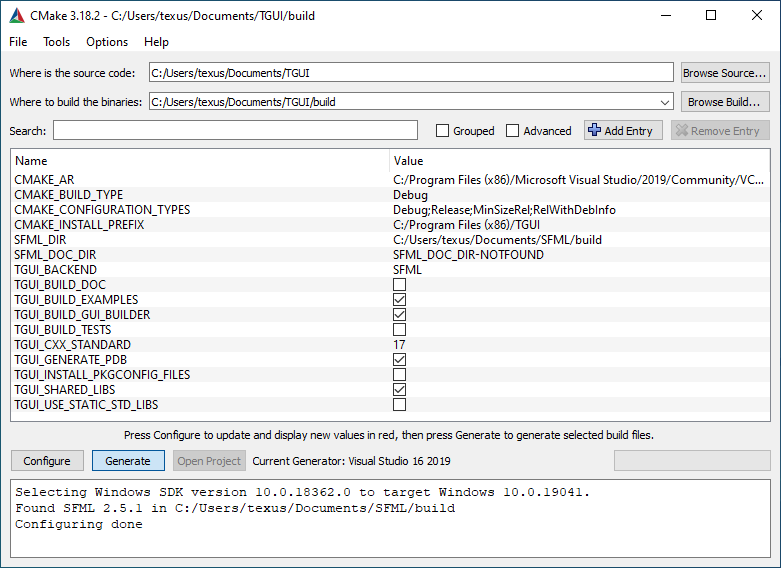
If you are new to CMake then it is worth noting that properties added since the last time you pressed the Configure button are shown with a red background. The red vs white background doesn’t show errors, it simply indicates which properties have been added and didn’t exist before. In the top right you can check/uncheck “Grouped” depending on how you want to list the properties and check/uncheck “Advanced” to show/hide some properties that are less likely to be needed.
Press the “Configure” button again when you make changes. When there are no more errors and you are satisfied with the settings, then press the “Generate” button to generate the project that will build TGUI.
In the sections below you can find instructions on how to build TGUI now, depending on which generator you selected earlier.
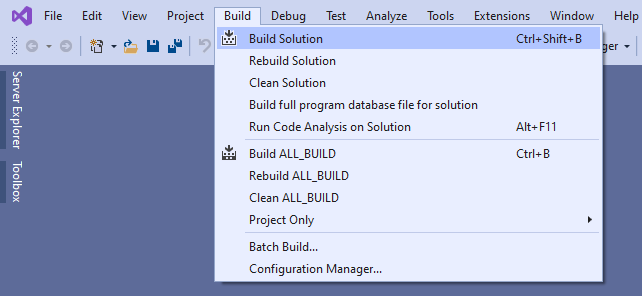
Generator: Visual Studio
You can press the “Open Project” button in CMake to open the generated Visual Studio project.
Visual Studio ignores the CMAKE_BUILD_TYPE setting, so you may still need to change the Solution Configuration to Debug or Release if it doesn’t has the right value.
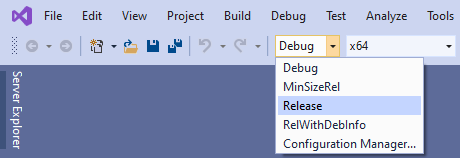
Now press “Build Solution” in the “Build” menu to build the TGUI libraries.
Once this is done, you will find the TGUI library inside the lib\Debug or lib\Release subdirectory of the build folder.
If you want TGUI libraries for both Debug and Release mode (which you most likely do), then you simply select the other configuration at the top of Visual Studio and hit the Build Solution button again.
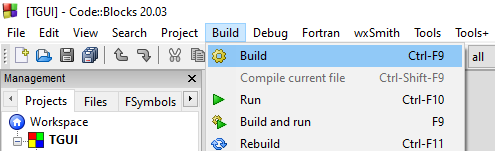
Generator: CodeBlocks
Open the tgui.cbp file that you find inside the build folder and press “Build” to create the TGUI libraries.
Once this is done, you will find the TGUI library inside the lib subdirectory of the build folder.
Generator: Makefiles
Open the build folder in a terminal and execute “make”. To speed up the build you can also type e.g. “make -j4”, which would use 4 threads to compile the library.